
|
|
|
Munich 1954
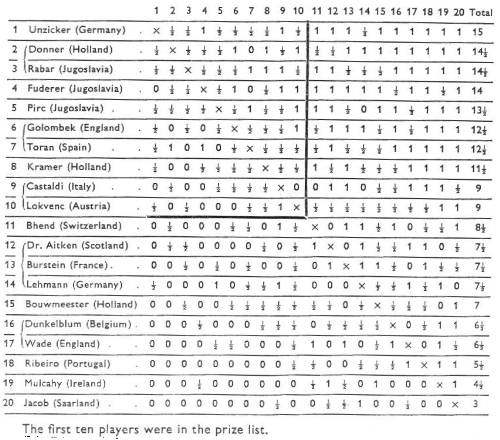
Dr J.M. Aitken was again the Scottish representative in this Western European Zonal tournament, played June 4 to 26.
This was a very hard event, with nineteen rounds having to be played in 22 days. Golombek, in an article in the British Chess Magazine states that the result "...was that towards the end of each phase of six consecutive rounds there were a number of blunders made through sheer fatigue. Those players who had a number of adjourned games had the severe task of playing these in the morning and then another full round's play later on in the day."
Dr J.M. Aitken - Dr H. Lehmann [B56]
Munich 1954, Zonal (14)

Dr Lehmann
Notes by Dr Aitken in the British Chess Magazine.
1.e4 c5 2.Nf3 d6 3.d4 cxd4 4.Nxd4 Nf6 5.Nc3 Nc6 6.g3 Bg4 7.f3 Bd7 8.Be3 g6 Black decides to develop on Dragon lines. The alternative 8...e6, continuing on Scheveningen lines, was adopted by Bhend against me in a later round. The choice is largely a matter of taste; the line adopted here gives Black a more solidly based game. 9.Bg2 Bg7 10.0-0 0-0 11.Qd2 Ne5 Loss of time, as is soon clear. Black would do better to play at once for simplification by 11...Nxd4 12.Bxd4 Bc6 (or 12...Rc8 ) 12.b3 Qc8 13.g4 I thought I had some advantage after the simple 13. Nd5 Nxd5 14. exd5 (because of my command of more space) but I hoped to secure more by the ambitious text move which, while avoiding immediate exchanges, envisages an eventual pawn advance on both wings. 13...Nc6 14.Rae1 Nxd4 15.Bxd4 e5 16.Be3 Be6 17.Nd5 Bxd5 Black must take the Knight before it can be supported further by c4. If 17...Nxd5 18.exd5 Bd7 19.Qb4 , White secures the better game, partly through Black's loss of time; but to surrender the two Bishops proves in the end even more disastrous. 18.exd5 Nd7 19.c4 a5 Black's thoughts are clearly fixed on the Queen's side, but I do not think it is merely my preference for an active defence which makes me believe he would have done better to play the admittedly double-edged 19...f5 The continuation could be 20.gxf5 gxf5 21.Bh6 Qe8 with chances for both sides. This line could also have been tried on Black's next move.20.Rc1 So as to meet 20...a4 by 21. b4. 20...Nc5 21.Bh3 A "mysterious Bishop move" to deter Black from ...f5. The same idea is behind my moves 22 to 24. 21...Qc7 22.Kh1 Rae8 23.Qc2 Kh8 24.Rg1 Re7 25.a3 Ra8 26.b4 Na6 27.Qd2 axb4 27...b6 - a move which might with advantage have been played earlier, e.g. on move 24 - would delay the advance of the Queen's Bishop's pawn but hardly prevent it permanently, as White can play 28. Rc2, and then double Rooks. c5, properly prepared, should lead to a win. 28.axb4 Ree8 To protect the back rank; for if now 28...b6 Black gets into trouble on the Queen's-Rook's file after 29.Ra1 and if 29...Qxc4 30.Rgc1 Qb3 (30...Qb5 31.Bf1 wins a piece.) 31.Rc3 Qxb4 32.Rxa6 and wins. 29.c5 Reb8 30.g5 Bf8 31.f4 White's last three moves constitute the positional decision and are the execution of the plan tentatively formed on move 13. The rest needs no comment; White's central phalanx rolls steadily onwards, hardly impeded by Black's desperate diversions and far-flung forays. 31...b5 32.fxe5 dxe5 33.d6 Qd8 34.Bg2 Qd7 35.Rgd1 Qg4 36.c6 Rd8 37.d7 Bxb4 38.Qb2 Kg8 39.Qxe5 Bc5 40.Bxc5 Nxc5 41.Qxc5 Ra2 42.Qd5 Black resigns.
The line adopted by Dr Aitken (6. g3) was a great favourite of his and was played by him on a number of occasions. After the moves 6...Bg4 7. f3, as in the above game, bad would be 7...Nxd4 8. Qxd4 Bxf3, for after 9. Bb5+ and 10. 0-0 White has the initiative. Readers interested in the line might like to look for some games by Paul Motwani, who also used the opening to great effect in several games [A. McGowan]
Here now is the game against Bhend, referred to in the notes above.
Dr J.M. Aitken - E. Bhend [B56]
Munich 1954, Zonal (18)1.e4 c5 2.Nf3 Nc6 3.d4 cxd4 4.Nxd4 Nf6 5.Nc3 d6 6.g3 Bg4 7.f3 Bd7 8.Be3 e6 As contrasted with 8...g6 this move is apt to result in a lively game, dangerous to both sides, particularly when Black, as here, operates on the Queen's side without first completing his King-side development. 9.Bg2 a6 10.a4 Qc7 11.0-0 Ne5 12.Qe1 Here I certainly underestimated the dangers on the diagonal to my King. 12. Kh1 was much safer. 12...Nc4 13.Bc1 d5?! Very double edged. Safer was 13...Qb6 14.Qf2 d5 15.Nb3 Qxf2+ 16.Rxf2 dxe4 17.Nxe4 Nxe4 18.fxe4 Bc6 with a slight advantage to Black. 14.Kh1 Qb6 15.Nb3 15...d4 is at first sight plausible; but 16. e5 dxc3 17. Qxc3 is in favour of White, who regains the piece with advantage. 15...dxe4 16.Nxe4 Be7 17.a5 Qa7 18.Nxf6+ Played with considerable hesitation as it assists Black's development, but I thought it was a greater evil to allow ...Nd5 with strong pressure on my e3. 18...Bxf6 19.Qe4 Rc8 20.Rd1 Bxb2 If 20...Nxb2 21.Be3 Qb8 22.Rxd7! Kxd7 23.Nc5+ with a dangerous (probably a winning) attack. 21.Bxb2 Nxb2 22.Rd4! Bb5 23.Qe5 Rg8 Best. 23...0-0? loses at once to 24. Rg4 and 23...Kf8 is answered with advantage in the same way. 24.Re4 Nc4 25.Qh5 Kf8 26.Rf4 Hereabouts I did not play the best moves. 26.Nd4 (threat Nxb5) 26...Nd6 27.Rf4 Ke7 28.Re1 leaves White with strong pressure and Black has less counterplay than in the game. 26...f6 27.Qxh7 e5 28.Rg4 I felt the game had now reached a crisis. I was uneasily aware I had relaxed the pressure in the last two moves and that Black had chances of a dangerous counter-attack (...Qf2, ...Ne3, ...Be2) and also had the possibility of trapping my Queen (e.g. after Re4 by ...Kf7 and ...Rh8). The text move, however, met the need of the moment. 29. Rxg7 is threatened and Black's most plausible defence (which he plays) opens the door to a combination. 28...Bd7 29.Rxc4! The main point of the sacrifice is that the wandering Queen is centralized and re-enters the game with great effect. On subsequent analysis I think the sacrifice wins; at the time I felt confident that it drew at least in all lines and gave good winning chances in over the board play. Incidentally, there has been a curious pattern in the play since move 22: the White Rook has moved one square to the right every second moves and now for the sacrifice it moves all the way back at one swoop. 29...Rxc4 30.Qd3 Be6 If 30...Bb5 White has at first glance a clear draw-probably one reason why Black (who hoped to prove the sacrifice unsound and win) rejected this line. In fact, I think White can win by 31.Qd8+ Kf7 32.Qd5+ Kf8 33.Bh3 and there are all too many threats. 31.Bh3 Rc6 If 31...Bf7 32.Qd6+ and mates in four moves. If 31...Bxh3 32.Qxc4 Qf2 33.Qc5+ (an essential point) 33...Qxc5 34.Nxc5 and White wins a pawn and the ending. 32.Qd8+ Kf7 33.Bxe6+ Rxe6 34.Qd7+ Re7 35.Qd5+ Kf8 36.Nc5 g6 This position marks the end of the combination started on move 29. The Knight is worth a Rook any time and despite his nominal material advantage Black's game is terribly difficult and he is really struggling for a draw. Bhend afterwards suggested 36...Rh8 as a drawing line; the idea is 37.Ne6+ Rxe6 38.Qxe6 Qf2 39.Qc8+ Kf7 40.Qxh8 Qxf3+ with a perpetual check. If, however, White replies 37. Rd1 (threatening 38. Ne6+, etc.) Black is quite helpless. 37.Qd6 Kf7 38.Ne4 Re6?[In time-pressure Black makes a mistake that ends the game at once. However, the position appears to be untenable in any event. If 38...Qd4 (the move I expected and probably the best) 39.Qxf6+ Ke8 40.Rb1 (threat Nd6+) 40...Rd7 41.Qe6+ Kf8 42.Nf6 Rf7 43.Nxg8 and wins. 39.Qd7+ Re7 40.Nd6+ Kg7 41.Qxe7+ Black resigns.
Sources:
British Chess Magazine 1954, pp 303/4 and 367/8.Alan McGowan
Historian, Chess Scotland